背景 在日常 k8s 维护使用过程,难免会有下面场景:
集群异常,etcd集群挂了,如何恢复数据?
使用者或管理员误删了命名空间或重要应用,如何快速恢复数据?
如何快速备份、迁移集群?
本文介绍两种备份还原工具:etcdctl 和 velero
使用etcdctl 安装etcdctl 1 2 3 4 5 6 7 8 9 10 11 12 13 14 # !/bin/bash ETCD_VER=v3.4.3 ETCD_DIR=etcd-download DOWNLOAD_URL=https://github.com/coreos/etcd/releases/download # Download mkdir ${ETCD_DIR} cd ${ETCD_DIR} wget ${DOWNLOAD_URL}/${ETCD_VER}/etcd-${ETCD_VER}-linux-amd64.tar.gz tar -xzvf etcd-${ETCD_VER}-linux-amd64.tar.gz # install cd etcd-${ETCD_VER}-linux-amd64 cp etcdctl /usr/local/bin/
查看完整脚本示例
1 2 3 4 5 6 7 8 9 10 11 12 13 14 15 16 17 18 19 20 21 22 23 24 25 26 27 28 29 30 31 32 33 34 35 36 37 38 39 40 41 42 43 44 45 46 47 48 49 50 51 52 53 54 55 56 57 58 59 60 61 62 63 64 65 66 67 68 69 70 71 72 73 74 75 76 77 78 79 80 81 82 83 84 85 86 87 88 89 90 91 92 93 94 95 96 97 98 99 100 101 102 103 104 105 106 107 108 109 110 111 112 113 # !/bin/bash # 基于 kubeadm 的 etcd 备份&还原脚本 # OPTIONS: # --endpoints gRPC endpoints # --etcd-name restore - Human-readable name for this member # --data-dir restore - Path to the data directory # --initial-advertise-peer-urls restore - List of this member's peer URLs to advertise to the rest of the cluster # --initial-cluster restore - Initial cluster configuration for restore bootstrap # etcdctl配置参数 export ETCDCTL_ENDPOINTS=https://192.168.1.11:2379 export ETCDCTL_CACERT=/etc/kubernetes/pki/etcd/ca.crt export ETCDCTL_CERT=/etc/kubernetes/pki/etcd/server.crt export ETCDCTL_KEY=/etc/kubernetes/pki/etcd/server.key # 备份目录 BACKUP_DIR=/var/etcd-snapshot # 静态pod暂存目录 STATIC_DIR=/tmp/etcd/manifests/ # 备份文件最大数量 MAX_BACKUP_COUNT=10 # etcd的hostpath路径 DATA_DIR=/raid/etcd ETCD_NAME="k8s-master" INITIAL_ADVERTISE_PEER_URLS="https://192.168.1.11:2380" INITIAL_CLUSTER="k8s-master=https://192.168.1.11:2380" action=$1 if [ "$action" != "backup" -a "$action" != "restore" ];then echo "Only allowed action: backup or restore" exit 1 fi shift # 无短参数需要用 "" 显式声明 ARGS=`getopt -o "" -l endpoints:,etcd-name:,data-dir:,initial-advertise-peer-urls:,initial-cluster: -- "$@"` eval set -- "${ARGS}" while true do case "$1" in --endpoints) ETCDCTL_ENDPOINTS=$2; shift 2 ;; --etcd-name) ETCD_NAME=$2; shift 2 ;; --data-dir) DATA_DIR=$2; shift 2 ;; --initial-advertise-peer-urls) INITIAL_ADVERTISE_PEER_URLS=$2; shift 2 ;; --initial-cluster) INITIAL_CLUSTER=$2; shift 2 ;; --) break ;; *) break ;; esac done checkEtcdctl() { if ! type etcdctl >/dev/null 2>&1; then echo "请先安装 etcdctl" exit 1 fi } ectdBackup() { test ! -d ${BACKUP_DIR} && mkdir -p ${BACKUP_DIR} source /etc/profile DATE=`date +%Y-%m-%d-%H-%M-%S` ETCDCTL_API=3 etcdctl snapshot save ${BACKUP_DIR}/etcd-snapshot-${DATE}.db &>/dev/null && echo "etcd备份完成" || { echo "etcd备份失败";exit; } # 检查快照 ETCDCTL_API=3 etcdctl --write-out=table snapshot status ${BACKUP_DIR}/etcd-snapshot-${DATE}.db cd $BACKUP_DIR && tar czf etcd-backup-${DATE}.tar.gz etcd-snapshot-${DATE}.db --remove-files # 只保留最近n个备份 ls -t ${BACKUP_DIR} |tail -n +${MAX_BACKUP_COUNT} | xargs -r rm ls -lh ${BACKUP_DIR} } etcdRestore() { test ! -d ${BACKUP_DIR} && mkdir -p ${BACKUP_DIR} test ! -d ${STATIC_DIR} && mkdir -p ${STATIC_DIR} # 暂停apiserver和etcd,防止恢复时写入数据 mv /etc/kubernetes/manifests/{kube-apiserver.yaml,etcd.yaml} ${STATIC_DIR} # 恢复,取最新的备份 backupFile=`ls -lt ${BACKUP_DIR} |grep "etcd-backup.*\.tar.gz"|head -n 1` if [ "${backupFile}" = "" ];then echo "没有备份文件" else backupFile=`echo ${backupFile} | awk '{print $9}'` backupFile=`tar -xzvf ${BACKUP_DIR}/${backupFile} -C ${BACKUP_DIR}` echo "正在还原备份: ${backupFile}..." test -d ${DATA_DIR} && rm -rf ${DATA_DIR} # 修改实际的 name 和地址 ETCDCTL_API=3 etcdctl snapshot restore ${BACKUP_DIR}/${backupFile} \ --name=${ETCD_NAME} \ --data-dir=${DATA_DIR} \ --initial-advertise-peer-urls=${INITIAL_ADVERTISE_PEER_URLS} \ --initial-cluster=${INITIAL_CLUSTER} rm ${BACKUP_DIR}/${backupFile} fi # 重新启动apiserver和etcd服务 mv ${STATIC_DIR}/{kube-apiserver.yaml,etcd.yaml} /etc/kubernetes/manifests } checkEtcdctl echo "etcd-endpoint: ${ETCDCTL_ENDPOINTS}, etcd-name: ${ETCD_NAME}, data-dir: ${DATA_DIR}, initial-advertise-peer-urls: ${INITIAL_ADVERTISE_PEER_URLS}, initial-cluster: ${INITIAL_CLUSTER}" case "${action}" in backup) ectdBackup ;; restore) etcdRestore ;; *) echo "未知参数: ${action}" exit 1 ;; esac
备份etcd etcd 集群中各数据是一致的,因此只需要对其中一个节点做备份就行,恢复可用同一个快照来恢复,核心流程:
1 2 3 4 5 6 7 8 9 10 11 # 执行备份 ETCDCTL_API=3 etcdctl snapshot save /var/etcd-snapshot/snapshot.db # 检查备份文件 ETCDCTL_API=3 etcdctl --write-out=table snapshot status /var/etcd-snapshot/snapshot.db +----------+----------+------------+------------+ | HASH | REVISION | TOTAL KEYS | TOTAL SIZE | +----------+----------+------------+------------+ | f2023283 | 38511 | 1143 | 4.6 MB | +----------+----------+------------+------------+
恢复etcd kubeadm kubeadm 部署的集群中的 etcd 是以静态容器的方式运行的,静态容器的配置文件存放目录是 /etc/kubernetes/manifests/。
1 2 3 4 5 6 7 8 9 10 11 12 # 停止 api-server 和 etcd 服务 mv /etc/kubernetes/manifests/{kube-apiserver.yaml,etcd.yaml} /tmp/etcd/manifests/ # 执行备份 ETCDCTL_API=3 etcdctl snapshot restore /var/etcd-snapshot/snapshot.db \ --name=etcd-name \ --data-dir=/raid/etcd \ --initial-advertise-peer-urls="https://xxx.xxx.x.xx:2380" \ --initial-cluster="etcd-name=https://xxx.xxx.x.xx1:2380" # 恢复 api-server 和 etcd 服务 mv /tmp/etcd/manifests/{kube-apiserver.yaml,etcd.yaml} /etc/kubernetes/manifests
二进制 etcd 集群以服务的形式在多台服务器运行,与容器方式不同的仅仅是服务的 endpoints 不一样,备份与 kubeadm 相同。
需要先手动停止 kube-apiserver 和 etcd 服务:
1 2 3 systmectl stop kube-apiserver systemctl stop etcd
恢复需要在每个 etcd 节点进行恢复。
1 2 3 4 5 6 7 8 # 每个etcd依次恢复,需要修改 name, initialadvertise-peer-urls等参数 ETCDCTL_API=3 etcdctl snapshot restore snap.db \ --name etcd-1 \ # 每台节点name不一样,根据当前节点etcd配置文件即可 --initial-cluster="etcd-1=https://192.168.1.11:2380,etcd-1=https://192.168.1.12:2380,etcd-1=https://192.168.1.13:2380" \ --initial-cluster-token=etcd-cluster \ --initialadvertise-peer-urls=https://192.168.1.11:2380 \ # 修改为当前节点ip --data-dir=/vaf/lib/default.etcd
最后启动 kube-apiserver 和 etcd 服务:
1 2 systemctl start kube-apiserver systemctl start etcd
提示:
使用velero Velero(以前的Heptio Ark)提供了备份和恢复 Kubernetes 集群资源和持久卷的工具,支持:
对集群进行备份,并在发生丢失时进行恢复
将集群资源迁移到其他集群。
将生产集群复制到开发和测试集群。
Velero包括:
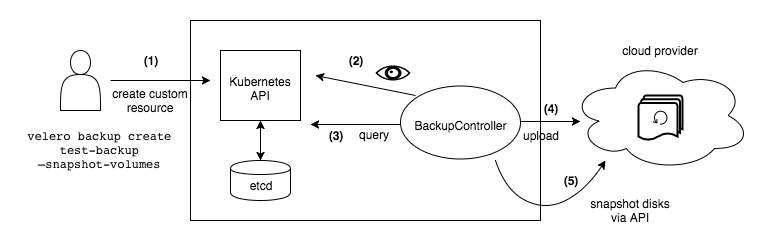
备份工作流程 1.Velero 客户端调用 Kubernetes API 服务器创建备份对象。
安装velero客户端 1.下载 velero-v1.7.1-linux-amd64.tar.gz /usr/local/bin
脚本参考 velero.sh
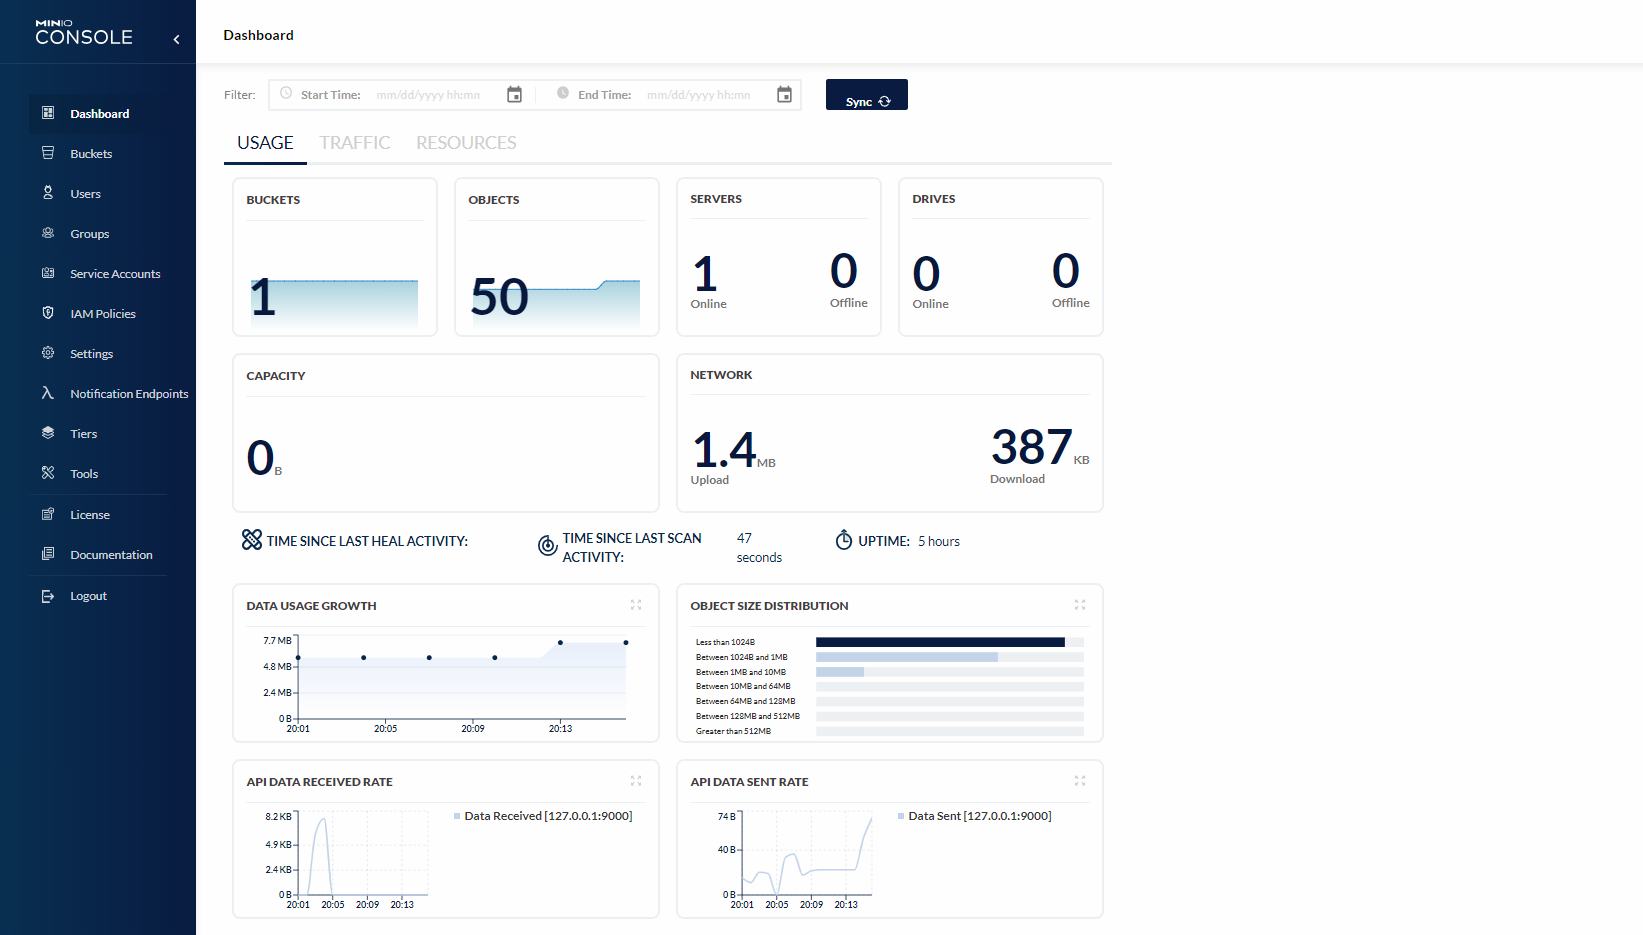
安装minio 这里使用 minio 来代替云环境的对象存储,在上面解压的压缩包中包含一个 examples/minio/00-minio-deployment.yaml
安装:
1 2 3 4 5 6 7 8 9 10 11 12 13 14 15 16 17 18 19 20 21 22 23 24 25 26 27 28 29 30 31 32 33 34 35 36 37 38 39 40 41 42 43 44 45 46 47 48 49 50 51 52 53 54 55 56 57 58 59 60 61 62 63 64 65 66 67 68 69 70 71 72 73 74 75 76 77 78 79 80 81 82 83 84 85 86 87 88 89 90 91 92 93 94 95 96 97 98 99 100 101 102 103 104 105 106 107 108 109 110 111 112 113 114 115 116 117 118 119 --- apiVersion: v1 kind: Namespace metadata: name: minio --- apiVersion: apps/v1 kind: Deployment metadata: namespace: minio name: minio labels: component: minio spec: strategy: type: Recreate selector: matchLabels: component: minio template: metadata: labels: component: minio spec: volumes: - name: storage emptyDir: {} - name: config emptyDir: {} containers: - name: minio image: minio/minio:latest imagePullPolicy: IfNotPresent args: - server - /storage - --config-dir=/config - --console-address=:9001 env: - name: MINIO_ROOT_USER value: "minio" - name: MINIO_ROOT_PASSWORD value: "minio123" ports: - containerPort: 9000 - containerPort: 9001 volumeMounts: - name: storage mountPath: "/storage" - name: config mountPath: "/config" --- apiVersion: v1 kind: Service metadata: namespace: minio name: minio labels: component: minio spec: type: NodePort ports: - name: api port: 9000 targetPort: 9000 - name: console port: 9001 targetPort: 9001 selector: component: minio --- apiVersion: batch/v1 kind: Job metadata: namespace: minio name: minio-setup labels: component: minio spec: template: metadata: name: minio-setup spec: restartPolicy: OnFailure volumes: - name: config emptyDir: {} containers: - name: mc image: minio/mc:latest imagePullPolicy: IfNotPresent command: - /bin/sh - -c - "mc --config-dir=/config config host add velero http://minio.minio:9000 minio minio@123 && mc --config-dir=/config mb -p velero/velero" volumeMounts: - name: config mountPath: "/config"
PS:
minio 的数据和配置可以用比如 cephfs 来做持久化。
一般推荐部署在集群外部。
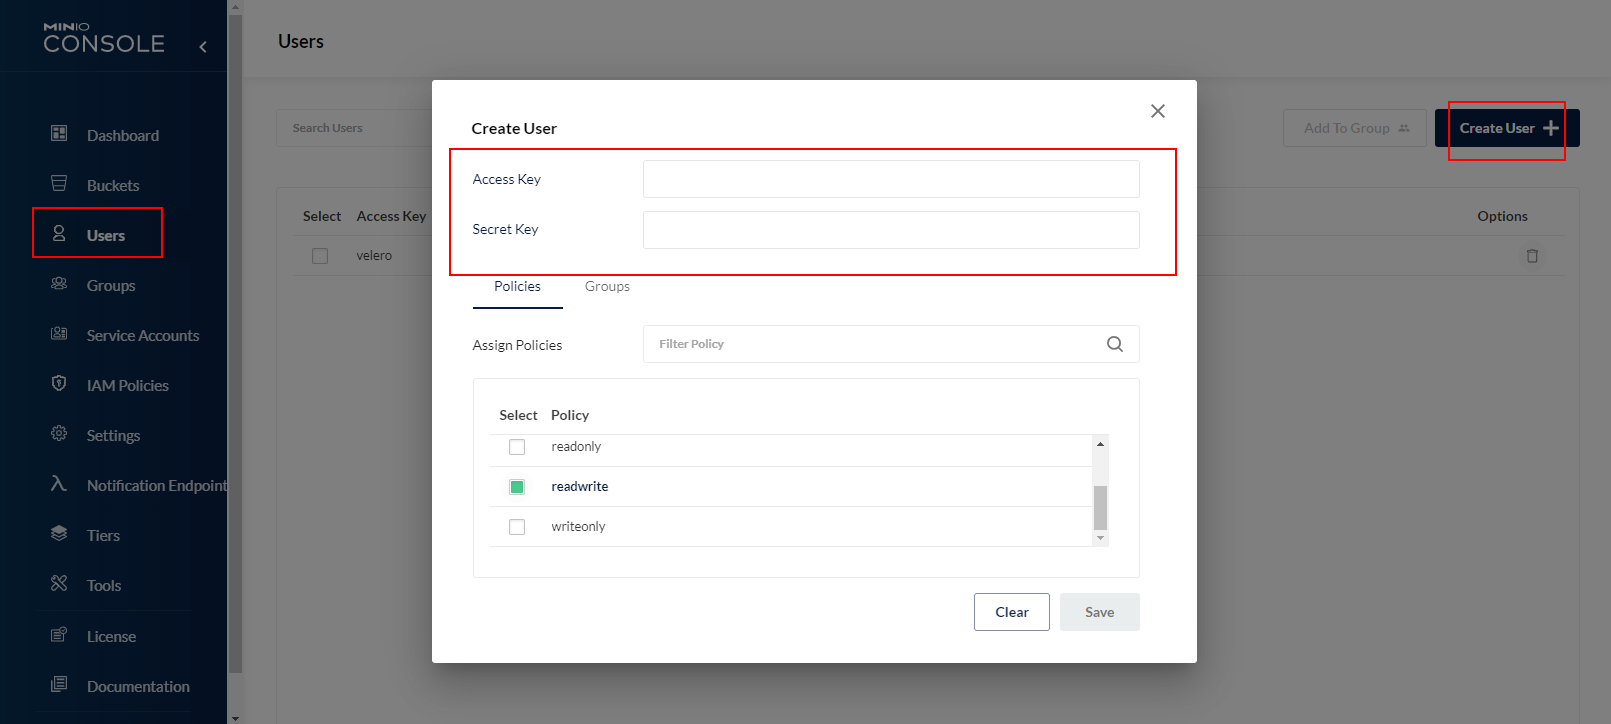
安装完成后使用yaml里的帐密登录,可选择创建一个 Buckets, 然后需要创建 User (记住id和key) 授权到对应 bucket 才能正常上传:
安装velero服务端 创建 minio 认证文件,使用上边创建的具有 readwrite 权限的用户:
1 2 3 4 5 cat > credentials-velero <<EOF [default] aws_access_key_id=velero aws_secret_access_key=velero@202112 EOF
1 2 3 4 5 6 7 8 9 10 # 修改bucket、s3Url地址(上面 minio 的地址,这里用 nodeport) velero install \ --plugins velero/velero-plugin-for-aws:latest \ --provider aws \ --bucket mybar \ --secret-file ./credentials-velero \ --namespace velero \ --use-volume-snapshots=false \ --use-restic \ --backup-location-config region=minio,s3ForcePathStyle="true",s3Url=http://192.168.1.31:30900
部署验证应用 velero 解压出来的文件有 /examples/nginx-app,下面 base.yaml 或 with-pv.yaml
修改 with-pv.yaml,使用 local-storage 模拟持久化卷:
1 2 3 4 5 6 7 8 9 10 11 12 13 14 15 16 17 18 19 20 21 22 23 24 25 26 27 28 29 30 31 32 33 34 35 36 37 38 39 40 41 42 43 44 45 46 47 48 49 50 51 52 53 54 55 56 57 58 59 60 61 62 63 64 65 66 67 68 69 70 71 72 73 74 75 76 77 78 79 80 81 82 83 84 85 86 87 88 89 90 91 92 93 94 95 96 97 98 99 100 101 102 apiVersion: v1 kind: Namespace metadata: name: nginx-example labels: app: nginx --- kind: StorageClass apiVersion: storage.k8s.io/v1 metadata: name: local-storage provisioner: kubernetes.io/no-provisioner volumeBindingMode: WaitForFirstConsumer --- kind: PersistentVolume apiVersion: v1 metadata: name: nginx-pv labels: app: nginx spec: capacity: storage: 50Mi local: path: /mnt/local-storage accessModes: - ReadWriteOnce storageClassName: local-storage nodeAffinity: required: nodeSelectorTerms: - matchExpressions: - key: kubernetes.io/os operator: In values: - linux --- kind: PersistentVolumeClaim apiVersion: v1 metadata: name: nginx-logs namespace: nginx-example labels: app: nginx spec: storageClassName: local-storage accessModes: - ReadWriteOnce resources: requests: storage: 50Mi volumeName: nginx-pv selector: matchLabels: app: nginx --- apiVersion: apps/v1 kind: Deployment metadata: name: nginx-deployment namespace: nginx-example spec: replicas: 1 selector: matchLabels: app: nginx template: metadata: labels: app: nginx annotations: pre.hook.backup.velero.io/container: fsfreeze pre.hook.backup.velero.io/command: '["/sbin/fsfreeze", "--freeze", "/var/log/nginx"]' post.hook.backup.velero.io/container: fsfreeze post.hook.backup.velero.io/command: '["/sbin/fsfreeze", "--unfreeze", "/var/log/nginx"]' spec: volumes: - name: nginx-logs persistentVolumeClaim: claimName: nginx-logs containers: - image: nginx:1.17.6 name: nginx ports: - containerPort: 80 volumeMounts: - mountPath: "/var/log/nginx" name: nginx-logs readOnly: false - image: ubuntu:bionic name: fsfreeze securityContext: privileged: true volumeMounts: - mountPath: "/var/log/nginx" name: nginx-logs readOnly: false command: - "/bin/bash" - "-c" - "sleep infinity"
1 2 # 部署 nginx kubectl apply -f with-pv.yaml
手动备份 备份支持全量备份、指定命名空间备份、指定选择器备份等方式,详细可以通过 velero backup create -h 查看帮助。
1 2 3 4 velero backup create nginx-backup --include-namespaces nginx-example --default-volumes-to-restic # 输出 Backup request "nginx-backup" submitted successfully. Run `velero backup describe nginx-backup` or `velero backup logs nginx-backup` for more details.
常用参数:
–include-namespaces: 指定命名空间来备份,多个逗号隔开
–include-resources:指定资源类型来备份,多个逗号隔开比如configmap,secret
–include-cluster-resources: 设置为 true 表示备份包含集群级别的资源,多个逗号隔开
–exclude-namespaces: 排查指定命名空间,多个逗号隔开
–exclude-resources: 排除指定某些资源类型
velero backup get 查看备份velero backup describe <backup name> --details 查看备份数据清单
定时备份 最实用的就是定时备份计划。
1 2 3 4 5 6 7 8 # 每六个小时备份一次,备份保留 1 个月 velero create schedule NAME --schedule="0 */6 * * *" --ttl 720h # 使用 @every 表达式,每 24 小时 备份 web 命名空间下的资源 velero create schedule NAME --schedule="@every 24h" --include-namespaces web # 从 schedule 最新一次的 backup 还原 velero restore create --from-schedule NAME
还原 只要有了备份数据文件就可以恢复,备份可以恢复,也可以指定命名空间或选择器进行单独恢复。
备份后手动删除命名空间,模拟集群数据丢失,此时 nginx 服务不可访问。
1 kubectl delete ns nginx-example
从刚刚备份的 backup 还原:
1 2 3 4 velero restore create --from-backup nginx-backup # 输出 Restore request "nginx-backup-20211228110902" submitted successfully. Run `velero restore describe nginx-backup-20211228110902` or `velero restore logs nginx-backup-20211228110902` for more details.
常用参数:
–namespace-mappings: 还原到与源不同的命名空间,比如old-ns-1:new-ns-1,old-ns-2:new-ns-2
–include-resources:指定资源类型来还原,多个逗号隔开比如configmap,secret
–include-namespaces: 指定命名空间来还原,多个逗号隔开
–exclude-namespaces: 排查指定命名空间,多个逗号隔开
–exclude-resources: 排除指定某些资源类型
备份完可以通过velero restore get 查看备份velero restore describe <backup name> --details 查看备份数据清单
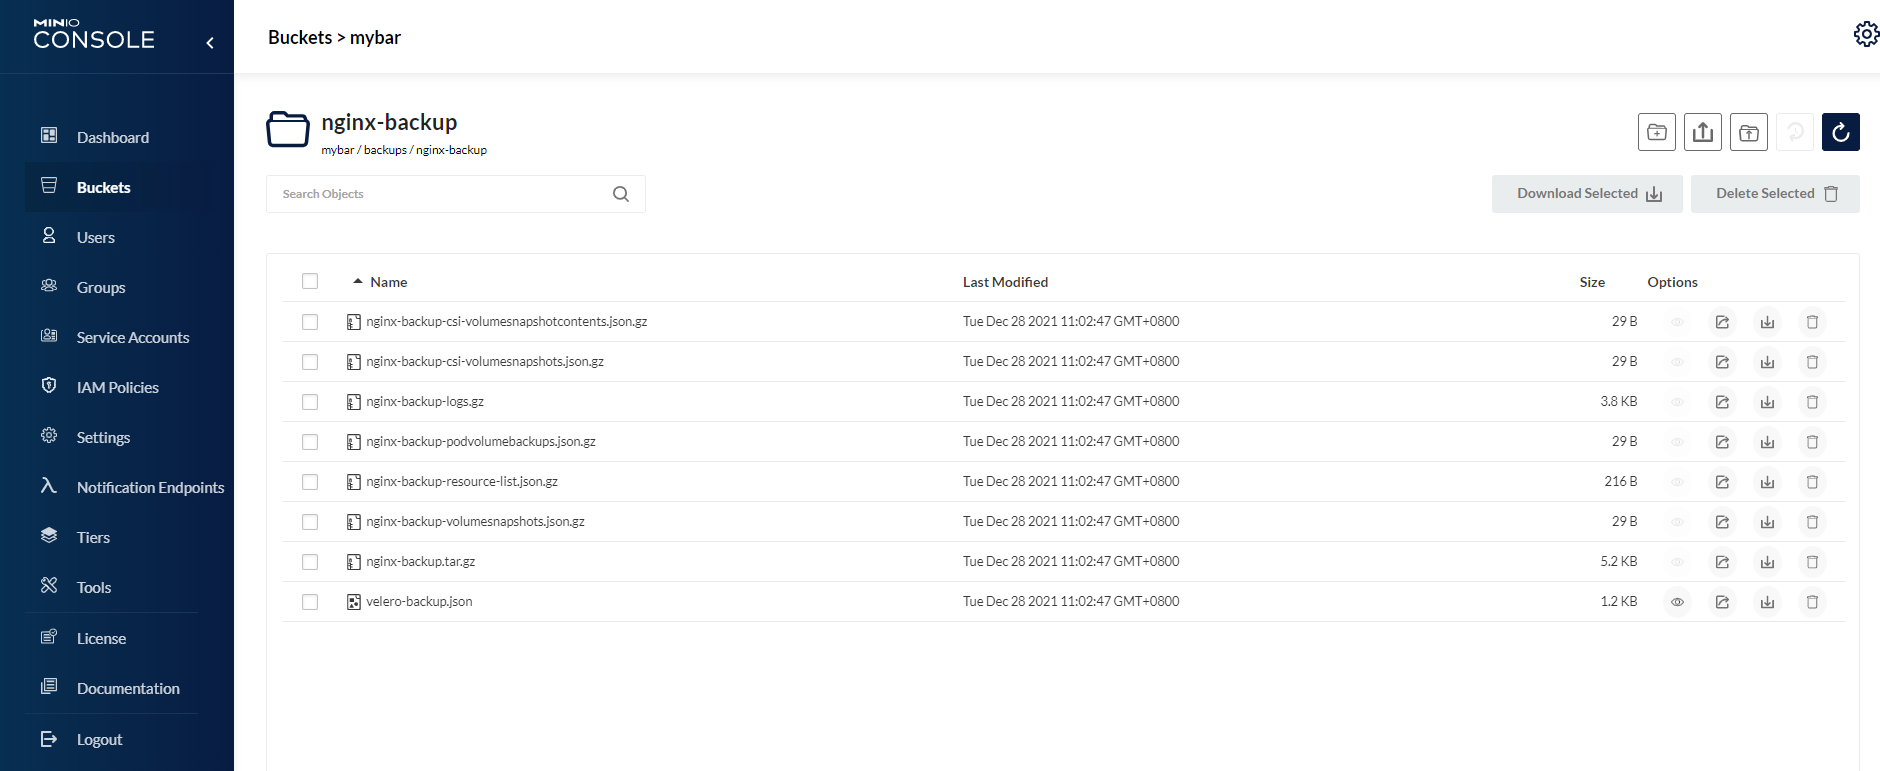
还可以在 minio 对应 buckets-restore 里看到备份文件:
常见问题 问题一: restore pv 一直处于 Released、pod 一直处于 Padding 状态Released 状态,pod 会一直 Pending,错误如下:error while running "VolumeBinding" filter plugin for pod "nginx-deployment-f96b7fd86-m6fwt": pod has unbound immediate PersistentVolumeClaimsspec.claimRef 字段,手动解除与pvc的绑定,恢复为 Available 状态,等一会就会自动与pvc再次绑定,数据不会丢失。
1 2 3 4 5 6 spec: capacity: storage: 50Mi claimRef: kind: PersistentVolumeClaim
再次检查 nginx 服务,访问正常。
问题二:minio dashboard 无法用 prometheus 采集数据
参考Collect MinIO Metrics Using Prometheus serviceMonitor
1.Minio 环境变量配置
1 2 3 4 5 6 7 env: - name: MINIO_PROMETHEUS_URL value: <prometheus_server_url> - name: MINIO_PROMETHEUS_JOB_ID value: <prometheus_config_job_name> - name: MINIO_PROMETHEUS_AUTH_TYPE value: public
2.Prometheus ClusterRolecannot list resource \"pods\" in API group \"\" in the namespace,表示没权限获取资源
1 2 3 4 5 6 7 8 9 10 11 12 13 14 15 16 17 18 19 20 21 22 23 24 25 26 apiVersion: rbac.authorization.k8s.io/v1 kind: ClusterRole metadata: name: prometheus-k8s rules: - apiGroups: - "" resources: - nodes/metrics verbs: - get - nonResourceURLs: - /metrics verbs: - get - apiGroups: - "" resources: - services - pods - endpoints verbs: - get - list - watch
参考 verlero.io